Kill Raphael's Old Enemy |
|
|---|---|
| Type | Quest |
| Act | Act 2 |
| Location | Gauntlet of Shar |
| Reward | Hellfire Crossbow Infernal Iron Boots of Brilliance |
Kill Raphael's Old Enemy is a Quest in Baldur's Gate 3. Kill Raphael's Old Enemy can be acquired during Act 2 and is related to Astarion's personal quest.
Kill Raphael's Old Enemy Objectives
- Deal with Raphael's Old Enemy
Kill Raphael's Old Enemy Walkthrough
- Raphael waits for your team just outside Grand Mausoleum (Thorm Mausoleum). Bring Astarion with you to learn more info from the devil.
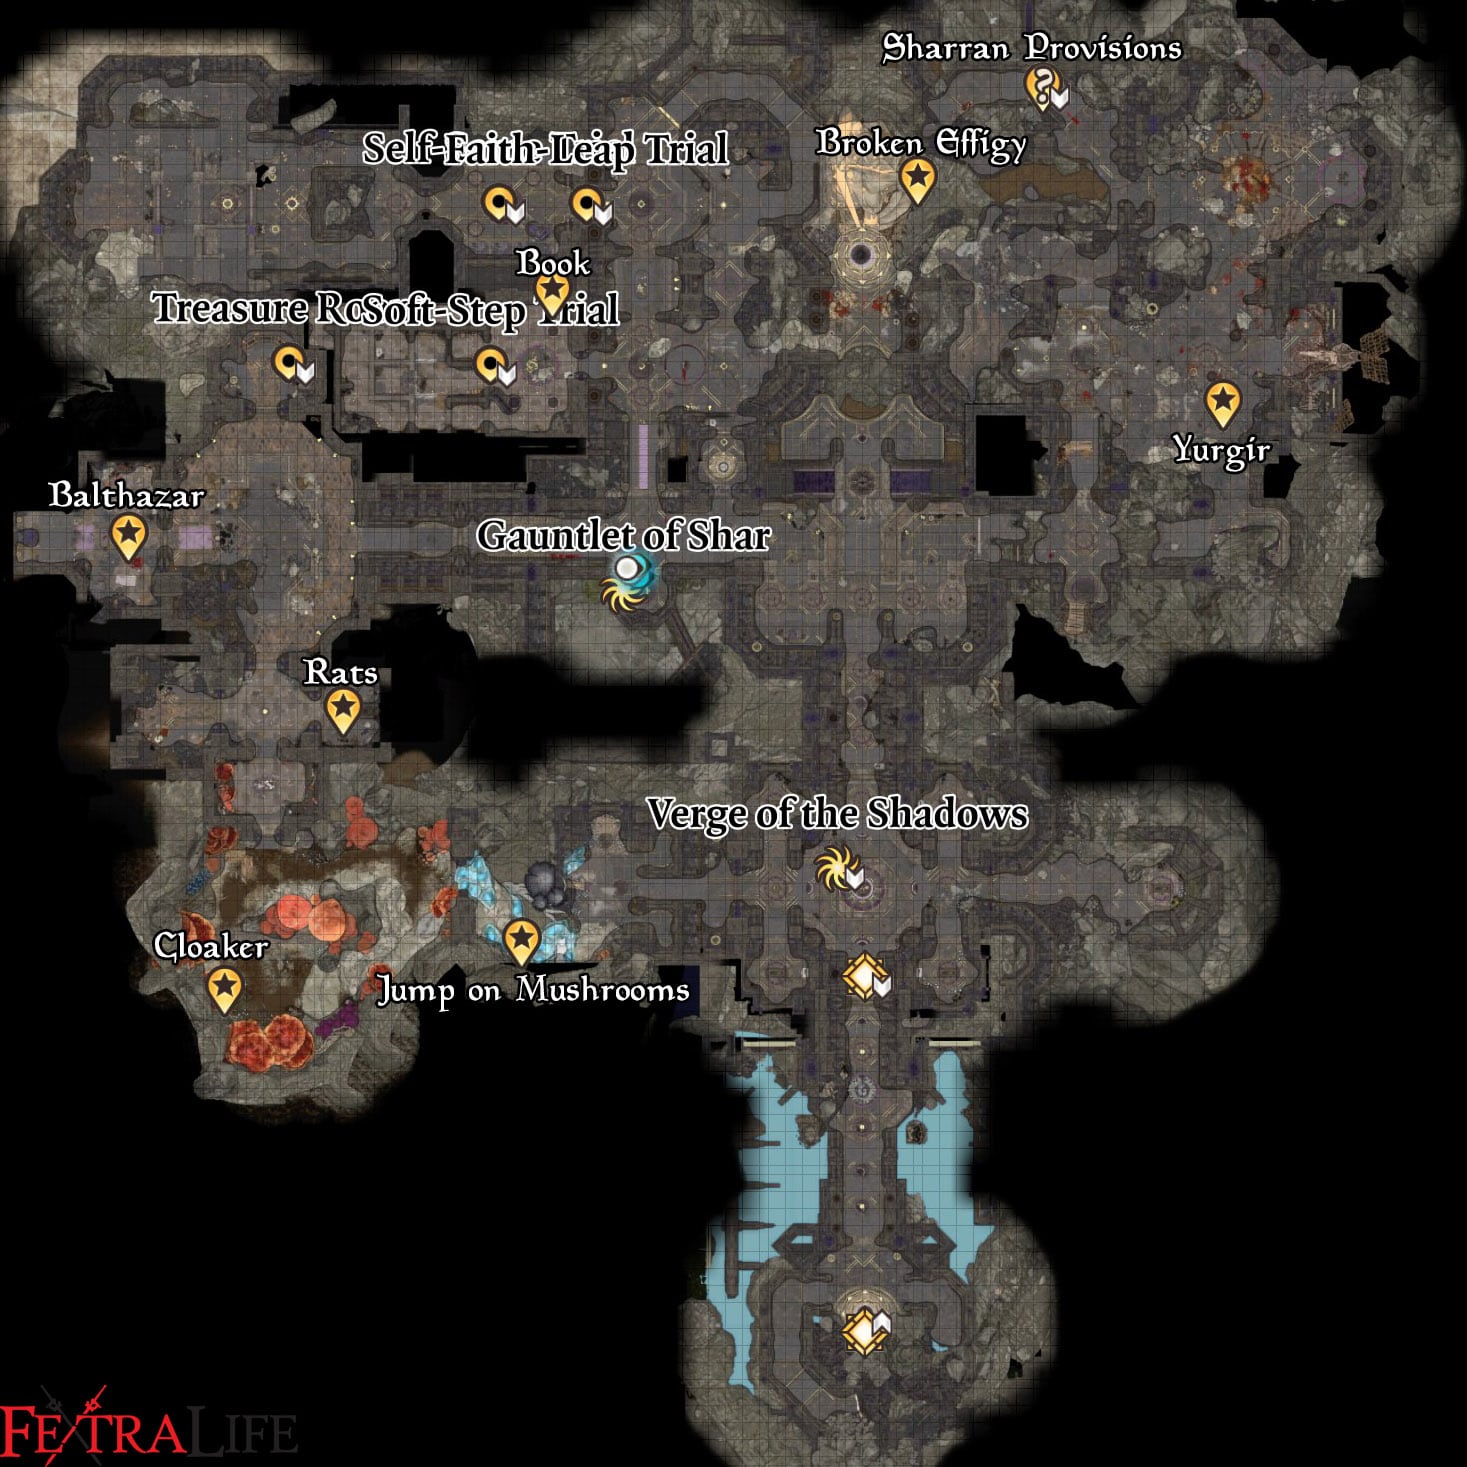
- The enemy Raphael seek to kill hides in the Gauntlet of Shar.
- You can reach Gauntlet through Grand Mausoleum, Reithwin Graveyard. In order to reveal the path, you need to press the buttons under the 3 paintings in the following order: Moonrise Towers, Grief, General. (You can find the clue in a book in that region.)

- Orthon Yurgir can be found in the east part of the area (X:-652 Y:-776). You can ask him to recite his contract and find the loophole in it, and deceive him into killing his own minions, even himself.
- You can also avoid the fight by Break Yurgir's Contract.
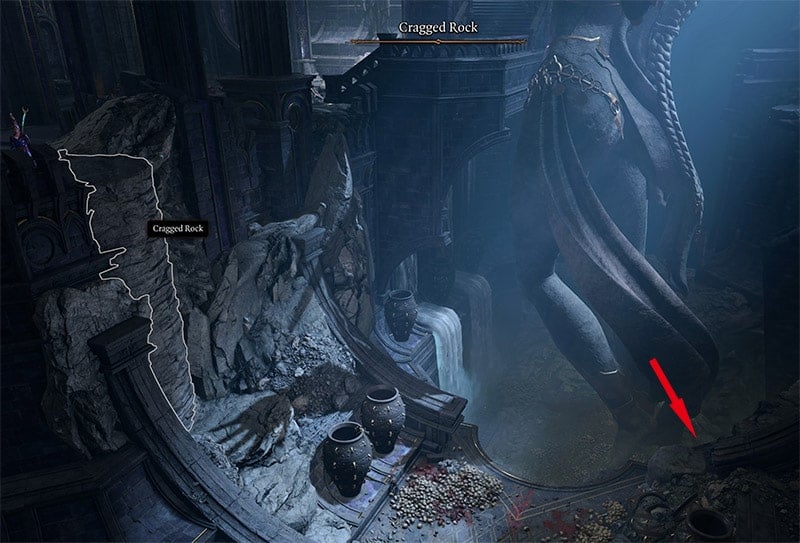
- After exiting your dialogue with Yurgir circle back to the T-junction (X:-684, Y:-754) just outside of the alcove/hallway off-shoot where you meet the devil. With your back towards Yurgir veer to the right until you hit a broken floor. Look to your left and you'll find a descending path you can walk downwards with. Once you reach the bottom you'll notice a Cragged Rock you can interact with to travel even lower. Make two more jumps down and click on the next Cragged Rock you find. Hang right and you'll discover a book called "One Becomes Many," a Cracked Helm of Shar, and a Broken Effigy (X:-709, Y:-723).

- Interact with the Broken Effigy. Regardless of whether you pass the passive Arcana check you'll be presented with a dialogue cutscene with one of the many rats you've seen throughout the temple. Using Speak with Animals on one of your party members, you'll want to then select the number 2 option "You're no ordinary rat, are you? None of you are." Following the rat's response choose the number 2 option again, "Are you telling me you're one person turned into a swarm of rats? How can that be?" After which you can finally select the 1st dialogue choice, "I don't usually bargain with rats. If I let you live, what's in it for me?"The rat will then offer to reveal the location of a secret stash of Sharran treasure. If want to find the hidden Sharran treasure he offers AND also kill him, then simply select the 1st dialogue option, "All right. Your lives for this treasure. You'd better be level with me." However, it is highly encouraged you save before the start of the dialogue in general or somewhere during as landing a killing blow on the rat while it's running around after the dialogue has ended can be difficult and you only have one shot at initiating the combat encounter to complete the quest. Otherwise, all the rats in the temple will disappear, leaving the quest un-finishable.
- Upon his death make sure to loot his body; Lyrthindor will drop a Very Rare scimitar called Justiciar's Scimitar along with a Rare shield called Justiciar's Greatshield (item details below).
- After killing all of them one of the rats will transform into the missing Dark Justiciar, Lyrthindor. He is a level 7 adversary with 112 hit points and no resistances. Be wary of his Sleep spell. You'll be asked to enter another dialogue. Here you're offered one final chance to back out of your hunt for the Dark Justiciar. But for the purposes of completing this quest just pick the "Attack" option and continue combat until the Dark Justiciar is dead.
- If you're not concerned with the treasure then all you need to do is choose the 2nd option "Attack." At this point combat will immediately initiate and you'll face off against a swarm of roughly 40 or so rats. Be mindful of the Soporific Rats if you're using melee characters, as the rat releases Narcoleptic Toxins upon death, which causes a Sleep spell to go off in a small radius around them. AoE spells and abilities or Magic Missile are extremely effective for this encounter.
- There is an Umbral Gem at Yurgir's location. Take it to complete the Gauntlet.
- Even if you failed to help Yurgir here, you can still persuade him to join your cause when fighting Rapheal in House of Hope.
How to unlock Kill Raphael's Old Enemy
- Raphael approaches you outside the Grand Mausoleum in the Shadow-Cursed Lands.
Kill Raphael's Old Enemy Rewards
- Hellfire Hand Crossbow
- Boots of Brilliance - Found in a chest north of where you fight Yugir the Orthon in the Gauntlet of Shar.
- Infernal Iron
Kill Raphael's Old Enemy Notes & Tips
- This fight can be completely avoided if you deal with the rats first. By killing the last Justiciar Yurgir's contract will be complete. Raphael will show up and whisk him away leaving behind the umbral stone required.
- Persuade him to kill his underlings will give you less exp than fight them, as you won't recieve any exp from those enemies.
 Anonymous
You actually can kill Yurgir first and then kill Lyrthindor, to loot the scimitar and shield.

 Anonymous
 Anonymous
Need to pass the insight check after he sings the song to have the options to make him kill himself appear.

 Anonymous
If you're a Warlock you don't get the persuasion options to get to Yurgir killing himself.

 Anonymous
If you do the rat quest first, you will break Astarion's agreement with Raphael.

 Anonymous
 Anonymous
Do i pray at the altar? so if what consequences does it have

Load more

If you use Fear, Command: Drop, or Disarming Strike on Yurgir he will drop a Hand Crossbow, and Shortsword with unique models that cannot be used by Humanoids, in addition he will still drop his Hellfire Hand Crossbow once you DO kill him. Additionally, I have never gotten the opportunity to talk with the fool. I've outright walked into the trap, waited, and nothing, I've tried going up to him, but it engages a fight, I've tried taking the gem, it starts a fight, I've tried killing the Displacer beast, it starts a fight. Is there something I am missing here? It's clearly possible to talk with him, I've not only seen the scene/interaction, but seen screenshots of it. I have not been able to obtain it personally. I'm clearly missing something. Is it similar to Flind in Act 1, where you have to wait for Flind to come to you despite being aggressive?
0
+10
-1